Introduction
Deploying resources to Azure utilising Azure DevOps and Azure Resource Manager (ARM) templates is a common practice used today. Aligning the deployment to a branching workflow that incorporates a completely automated continuous integration (CI) and continuous delivery (CD) model can be challenging.
Today we are going to show you how by deploying an ARM template with Azure DevOps using a GitHub Flow branching workflow.
GitHub Flow
For those of you who are not familiar with GitHub Flow, it is a common branching workflow used to today that is a lightweight, branch-based workflow allowing for quick deployments.
The illustration below provides a great overview.

For more information on GitHub Flow visit: https://guides.github.com/introduction/flow/
Azure DevOps
To get Azure DevOps aligned with GitHub Flow we need it configured in a way where we can;
- Commit a code change to our ARM template
- Raise a pull request to merge the change into our Azure Repository
- Automatically run integration tests on our ARM template
- Merge code into our master branch
- Deploy code into our Azure environments in a controlled manner
So lets get started, in this scenario we will be utilising an existing ARM template that i have stored in my Azure repository.
The ARM template is stored in directory “New-StorageAccount”, which I used to deploy Storage Accounts to Azure.

Continuous Integration (CI)
The first thing we need to do is configure Azure DevOps for continuous integration. This will require a few things.
- Azure Pipeline Template
- Azure CI Pipeline
- Build Validation Policy
Azure Pipeline Template
Templates is how we are going to standardise the integration tests that will ensure our ARM templates have been built correctly.
- Create a pipeline template
- Add a task with the integration test you would like to run (in this case we are starting with a simple ARM template validation test).
- Add a task to publish the pipeline artifact
PRO TIP It is good practice to publish pipeline artifacts with unique names to provide the ability for deployment pipelines to reference specific builds, example below.
parameters:
  serviceConnection: ""
  resourceGroup: ""
  location: ""
  templateFile: ""
  templateParametersFile: ""
  overrideParameters: ""
  deploymentMode: Validation

stages:
- stage: build
  displayName: Build
  jobs:
  - job: build
    displayName: Build
    pool:
      vmimage: windows-2019
    steps:
    - task: AzureResourceGroupDeployment@2
      displayName: 'Validate ARM Template'
      inputs:
        azureSubscription:  '${{parameters.serviceConnection}}'
        resourceGroupName: '${{parameters.resourceGroup}}'
        location: '${{parameters.location}}'
        csmFile: '${{parameters.templateFile}}'
        csmParametersFile: '${{parameters.templateParametersFile}}'
        overrideParameters: '${{parameters.overrideParameters}}'
        deploymentMode: '${{parameters.deploymentMode}}'

    - task: PowerShell@1
      displayName: 'Get ARM Template directory'
      inputs:
        scriptType: inlineScript
        arguments: '-directory ${{parameters.templateFile}}'
        inlineScript: |
          param(
          [string]$directory
          )
          $date = get-date -Format yyyy-MM-dd-hhmmss
          $templateDirectory = $directory.Substring(0,$directory.LastIndexOf("/"))
          write-output ("##vso[task.setvariable variable=templateDirectory;]$templateDirectory")
          write-output ("##vso[task.setvariable variable=artifactDate;]$date")

    - task: PublishPipelineArtifact@1
      displayName: 'Publish Pipeline Artifact'
      inputs:
        path: $(templateDirectory)
        artifact: drop_$(artifactDate)
Azure CI Pipeline
The Azure CI pipeline will run the integration tests on the storage account ARM template by using the Azure pipeline template created previously.
Create a pipeline called StorageAccounts-CI.yml, as per below.
NOTE It is important to set the trigger to none as we only want the pipeline to run when a pull request is created.
trigger: none

name: StorageAccounts-CI

variables:
- group: Variables - Storage

stages:
- template: 'ARMBuildTemplate.yml'
  parameters:
    serviceConnection: '$(serviceConnectionPrd)'
    resourceGroup: '$(rgDiagShd)'
    location: '$(primaryLoc)'
    templateFile: 'New-StorageAccount/New.StorageAccount.json'
    templateParametersFile: 'New-StorageAccount/New.StorageAccount.parameters.json'
    overrideParameters: '-storageName "$(diagShdStorageAccount)" -accountType "Standard_LRS" -accessTier "Hot" -kind "StorageV2" -softDeleteRetentionDays 7'
Build Validation Policy
Build Validation Policies is how we configure the Azure CI pipeline only to run when a new pull request is created.
Enable a build validation policy on the master branch of your Azure repository by;
- Select Repos > Branches within Azure DevOps
- Select the … button on the master branch. Select Branch policies from the context menu
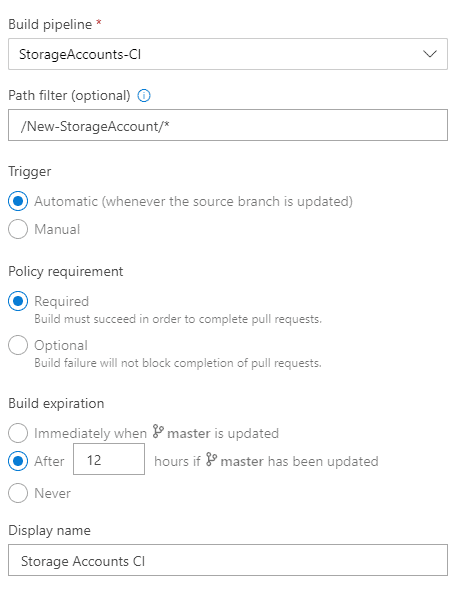
- Click Add Build Policy
- Select the StorageAccounts-CI pipeline
- Specify a path filter of /New-StorageAccount/* (this is required so the policy only applies if changes are detected in this directory)
- Specify the remaining options according to your preferences
- Click Save
We’re done! Now when a pull request is created with code changes to the storage account ARM template, the StorageAccounts-CI pipeline will run automatically and run the integration tests specified in the pipeline template.
Example of a pull request is below.

Continuous Deployment (CD)
Now that Azure DevOps is configured for continuous integration, we now need to configure Azure DevOps with continuous deployment so we can automatically deploy our ARM template to our environments in Azure. This will require a couple of things:
- Azure DevOps Environments
- Azure CD pipeline
Azure DevOps Environments
An Azure DevOps environment allows you to logically separate your deployments (DEV, NON-PROD, PROD, etc.) and control deployments between each stage with approvals.
Create your environments by;
- Select Pipelines> Environments within Azure DevOps
- Click New Environment
- Specify a name
- Click Create
I’ll be creating three environments, Development, Non-Production and Production. Once created, enable approvals on the appropriate environments (in this case Non-Production and Production) by;
- Click the environment name
- Select the … button and click Approvals and Checks
- Click the + button > Approvals
- Enter in the name of user(s) to approve deployments to the environment
- Click Create


Azure CD Pipeline
The Azure CD pipeline will deploy the storage account ARM template to each environment once a pull request has be completed.
Create a pipeline called StorageAccounts-CD, as per below.
NOTE It is important to set the trigger to master and specify a path filter as we want the pipeline only to run when code is merged into the New-StorageAccount directory.
trigger:
  branches:
    include:
      - master
  paths:
    include:
      - New-StorageAccount/*

name: StorageAccounts-CD

variables:
  - group: Variables - Storage

stages:
  - stage: Development
    jobs:
      - deployment: storage_accounts_dev
        displayName: Deploy Storage Accounts
        pool:
          vmimage: windows-2019
        environment: Development
        strategy:
          runOnce:
            deploy:
              steps:
                - task: DownloadPipelineArtifact@2
                  displayName: 'Download Latest Artifact'
                  inputs:
                    buildType: specific
                    project: AzureFoundations
                    definition: StorageAccounts-CI

                - task: AzureResourceGroupDeployment@2
                  displayName: Deploy Dev Diagnostic Storage Account
                  inputs:
                    azureSubscription: "$(serviceConnectionNpd)"
                    resourceGroupName: "$(rgDiagNpd)"
                    location: "$(primaryLoc)"
                    csmFile: '$(Build.ArtifactStagingDirectory)/drop/New.StorageAccount.json'
                    csmParametersFile: '$(Build.ArtifactStagingDirectory)/drop/New.StorageAccount.parameters.json'
                    overrideParameters: '-storageName "$(diagNpdStorageAccount)" -accountType "Standard_LRS" -accessTier "Hot" -kind "StorageV2" -softDeleteRetentionDays 7'
                    deploymentMode: Validation

  - stage: NonProduction
    jobs:
      - deployment: storage_accounts_npd
        displayName: Deploy Storage Accounts
        pool:
          vmimage: windows-2019
        environment: Non-Production
        strategy:
          runOnce:
            deploy:
              steps:
                - task: DownloadPipelineArtifact@2
                  displayName: 'Download Latest Artifact'
                  inputs:
                    buildType: specific
                    project: AzureFoundations
                    definition: StorageAccounts-CI

                - task: AzureResourceGroupDeployment@2
                  displayName: Deploy NonProd Diagnostic Storage Account
                  inputs:
                    azureSubscription: "$(serviceConnectionNpd)"
                    resourceGroupName: "$(rgDiagNpd)"
                    location: "$(primaryLoc)"
                    csmFile: '$(Build.ArtifactStagingDirectory)/drop/New.StorageAccount.json'
                    csmParametersFile: '$(Build.ArtifactStagingDirectory)/drop/New.StorageAccount.parameters.json'
                    overrideParameters: '-storageName "$(diagNpdStorageAccount)" -accountType "Standard_LRS" -accessTier "Hot" -kind "StorageV2" -softDeleteRetentionDays 7'
                    deploymentMode: Incremental

  - stage: Production
    jobs:
      - deployment: storage_accounts_prd
        displayName: Deploy Storage Accounts
        pool:
          vmimage: windows-2019
        environment: Production
        strategy:
          runOnce:
            deploy:
              steps:
                - task: DownloadPipelineArtifact@2
                  displayName: 'Download Latest Artifact'
                  inputs:
                    buildType: specific
                    project: AzureFoundations
                    definition: StorageAccounts-CI

                - task: AzureResourceGroupDeployment@2
                  displayName: Deploy Prod Diagnostic Storage Account
                  inputs:
                    azureSubscription: "$(serviceConnectionPrd)"
                    resourceGroupName: "$(rgDiagPrd)"
                    location: "$(primaryLoc)"
                    csmFile: '$(Build.ArtifactStagingDirectory)/drop/New.StorageAccount.json'
                    csmParametersFile: '$(Build.ArtifactStagingDirectory)/drop/New.StorageAccount.parameters.json'
                    overrideParameters: '-storageName "$(diagPrdStorageAccount)" -accountType "Standard_LRS" -accessTier "Hot" -kind "StorageV2" -softDeleteRetentionDays 7'
                    deploymentMode: Incremental
We’re done! Now when a pull request is completed the StorageAccounts-CD pipeline will run automatically and deploy to each environment with the approvals required for the Non-Production and Production environments.
Example below of a successful deployment.

The 1 check passed link shows details of the approval.

That’s it! We have now successfully deployed an ARM template using Azure DevOps with a GitHub Flow workflow.


")
