Hi there! 👋
Welcome to the eighth and final entry of the Azure MLOps Challenge Blog! 🎉
In my previous post we finished the Azure MLOps Challenge “proper” and deployed our model to an online endpoint using GitHub Actions and validated it’s functionality with the Azure ML CLI. In this post we’ll complete a bonus module of my making to consume (inference) the Model using a functioning web app. 🥳 We’ll use Github Actions to deploy Azure Web App infrastucture using Bicep then deploy a basic flask app using the Azure Web App Service Deploy action.
This is going to be a long one, so let’s get started! 🚀
Bonus Challenge: Deploy a web app
The Objectives of the bonus challenge are as follows:
- Create Azure resources using Bicep.
- Deploy a web app using GitHub Actions.
- Consume the model using the web app.
Note: As a general “theme” going forward, I’ve tried to keep the code as verbose as possible to make it easier to follow. This means that I’ve used a lot of hard coded values and comments in the code. In a production environment you would look to parameterise the values and move the parameters/variable to a paramater file or App Configuration store.
Create Azure resources using Bicep
We’ll use Bicep to create the Azure resources required to host our web app. Bicep is a Domain Specific Language (DSL) for deploying Azure resources declaratively. It’s a great alternative to ARM templates and is much easier to read and write.
To keep things simple we’ll deploy deploy the App Service Plan and App Service in the same resource group as our Azure Machine Learning workspace. In a production environment you would look to deploy the App Service Plan and App Service in a separate resource group, maybe even separate subscription and Landing Zones.
Create a new infra folder under src then create a new main.bicep file in the infra folder with the following code:
param location string = resourceGroup().location
param keyVaultName string = 'myworkspkeyvault43303873'

@description('Reference an existing Key Vault')
resource kv 'Microsoft.KeyVault/vaults@2023-02-01' existing = {
  name: keyVaultName
}

@description('Create an App Service Plan with a Basic SKU')
resource exampleAppServicePlan 'Microsoft.Web/serverfarms@2022-09-01' = {
  name: 'mlflow-ASP'
  location: location
  kind: 'Linux'
  properties: {
    reserved: true
  }
  sku: {
    tier: 'Basic'
    name: 'B1'
  }
}

@description('Create the App Service with a system-assigned identity')
resource exampleAppService 'Microsoft.Web/sites@2022-09-01' = {
  name: 'mlflow-appservice' // must be globally unique
  location: location
  kind: 'linux'
  identity: {
    type: 'SystemAssigned'
  }
  properties: {
    serverFarmId: exampleAppServicePlan.id
    reserved: true
    siteConfig: {
      linuxFxVersion: 'PYTHON|3.11'
    }
  }
}

@description('Configure the App Service with the Key Vault secrets')
resource exampleAppServiceConfig 'Microsoft.Web/sites/config@2022-09-01' = {
  name: 'web'
  parent: exampleAppService
  properties: {
    appSettings: [
      {
        name: 'API_KEY'
        value: '@Microsoft.KeyVault(SecretUri=https://${kv.name}.vault.azure.net/secrets/apiKey/)'
      }
      {
        name: 'AZURE_ML_ENDPOINT_URL'
        value: '@Microsoft.KeyVault(SecretUri=https://${kv.name}.vault.azure.net/secrets/endpointUrl/)'
      }
      {
        name: 'SCM_DO_BUILD_DURING_DEPLOYMENT'
        value: '1'
      }
    ]
  }
}

@description('This is the built-in Key Vault Secrets User role. See https://docs.microsoft.com/azure/role-based-access-control/built-in-roles')
resource keyVaultSecretsUser 'Microsoft.Authorization/roleDefinitions@2022-04-01' existing = {
  name: '4633458b-17de-408a-b874-0445c86b69e6'
}

@description('Assign the Key Vault Secrets User role to the App Service')
resource roleAssignment 'Microsoft.Authorization/roleAssignments@2022-04-01' = {
  name: guid(kv.id, exampleAppService.id)
  properties: {
    principalId: exampleAppService.identity.principalId
    roleDefinitionId: keyVaultSecretsUser.id
    principalType: 'ServicePrincipal'
  }
  scope: kv
}
Okay, so there’s a lot going on here. Let’s break it down:
First we have some parameters. These are values that we can pass in when we deploy the Bicep template. We’re using the resourceGroup().location function to get the location of the resource group that the template is being deployed to. We’re also using a keyVaultName parameter to reference an existing Key Vault. We’ll use this Key Vault to store the API key and endpoint URL for our Azure Machine Learning workspace.
Next we have a resource declaration for the Key Vault. This is a special type of resource declaration that references an existing resource. We’re using this to reference the Key Vault created by the Azure Machine Learning workspace in the first part of the challenge.
Next we have a resource declaration for the App Service Plan. We’re using the properties property to set the reserved property to true. This will ensure that the App Service Plan is always available and won’t be scaled down to zero.
Next we have a resource declaration for the App Service. We’re using the identity property to create a system-assigned identity for the App Service. We’re also using the properties property to set the reserved property to true and the siteConfig property to set the linuxFxVersion property to PYTHON|3.11. This will ensure that the App Service is always available and will use Python 3.11.
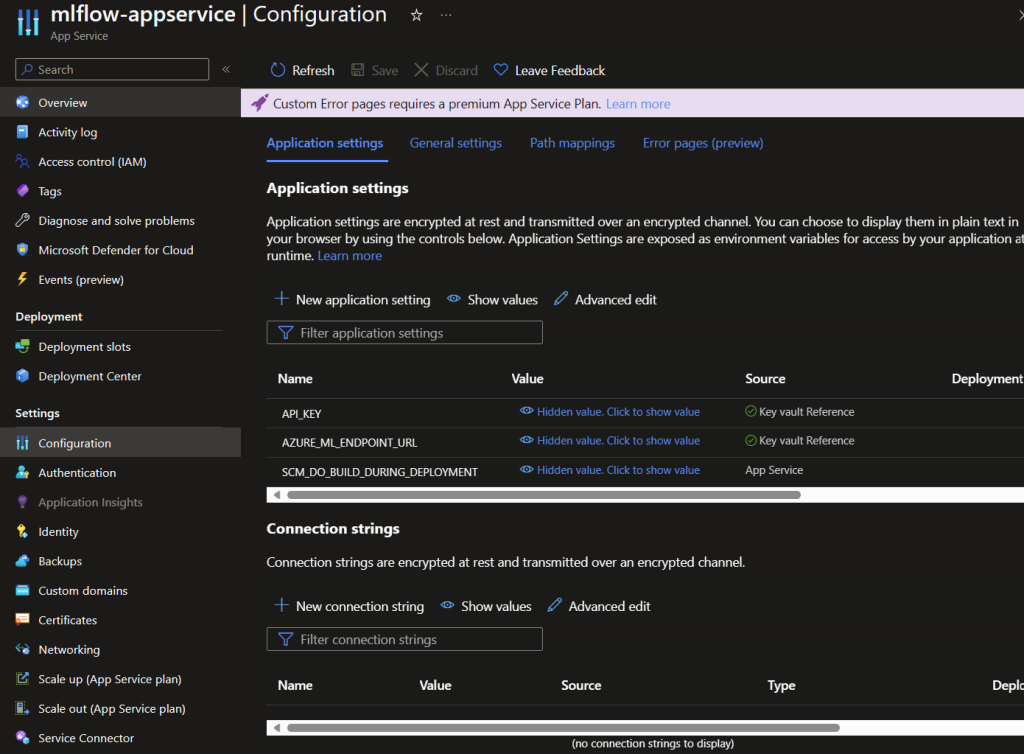
Next we have a resource declaration for the App Service configuration. We’re using the properties property to set the appSettings property to an array of objects. Each object contains a name property and a value property. We’re using the @Microsoft.KeyVault function to reference the Key Vault and the SecretUri property to reference the API key and endpoint URL for the Azure Machine Learning workspace, these will all be created in the GitHub Actions workflow. We’re also using the SCM_DO_BUILD_DURING_DEPLOYMENT app setting to ensure that the App Service is not “re-zipped” during deployment. The GitHub Action will zip and deploy the web app code to the App Service.
Next we have a resource declaration for the Key Vault Secrets User role.
Finally we have a resource declaration for the role assignment. We’re using the properties property to set the principalId property to the Principal ID of the App Service identity, the roleDefinitionId property to the id property of the Key Vault Secrets User role. We’re using the scope property to set the scope to the id property of the Key Vault.
Create a workflow to deploy the Bicep template
Now, we’ll create a workflow to deploy the Bicep template. No fancy triggering methods this time ’round. We’ll just be triggering the workflow manually from the GitHub Portal.
Create a new deploy-infra.yml file in the .github/workflows folder with the following code:
on:
    workflow_dispatch:

permissions:
    id-token: write
    contents: read

env:
    resource-group: myResourceGroup # name of the Azure resource group
    ml-workspace: myWorkspace # name of the Azure Machine Learning workspace
    mlEndpointUrl: 'https://mlflow-endpoint-1.australiaeast.inference.ml.azure.com/score' # name of the Azure Machine Learning endpoint
    mlEndpointName: mlflow-endpoint-1 # name of the Azure Machine Learning endpoint
    keyVaultName: 'myworkspkeyvault43303873'

jobs:
    bicep-whatif:
      name: 'Bicep What-If'
      runs-on: ubuntu-latest
      steps:
        - name: Checkout code
          uses: actions/checkout@v3

        - name: 'Az CLI login'
          uses: azure/login@v1
          with:
            client-id: ${{ secrets.AZURE_CLIENT_ID }}
            tenant-id: ${{ secrets.AZURE_TENANT_ID }}
            subscription-id: ${{ secrets.AZURE_SUBSCRIPTION_ID }}

        - name: Install az ml extension
          run: az extension add -n ml -y

        - name: Retrieve API key
          run: |
            ENDPOINT_KEY=$(az ml online-endpoint get-credentials -n ${{ env.mlEndpointName }} -g ${{ env.resource-group }} -w ${{ env.ml-workspace }} -o tsv --query primaryKey)
            echo ::add-mask::$ENDPOINT_KEY
            echo ENDPOINT_KEY=$ENDPOINT_KEY >> $GITHUB_ENV

        - name: add secret to key vault
          run: |
            az keyvault secret set --vault-name ${{ env.keyVaultName }} --name 'apiKey'  --value ${{ env.ENDPOINT_KEY }}
            az keyvault secret set --vault-name ${{ env.keyVaultName }} --name 'endpointUrl' --value ${{ env.mlEndpointUrl }}

        # Run what-if deployment
        - name: What-If
          uses: azure/arm-deploy@v1
          with:
            scope: resourcegroup
            failOnStdErr: false
            resourceGroupName: ${{ env.resource-group }}
            template: src\infra\main.bicep
            additionalArguments: --what-if

    bicep-deploy:
      name: 'Bicep Deploy'
      runs-on: ubuntu-latest
      environment: prod
      needs: [bicep-whatif]

      steps:
        # Checkout the repository to the GitHub Actions runner
        - name: Checkout
          uses: actions/checkout@v3

        # Authenticate to Az CLI using OIDC
        - name: 'Az CLI login'
          uses: azure/login@v1
          with:
            client-id: ${{ secrets.AZURE_CLIENT_ID }}
            tenant-id: ${{ secrets.AZURE_TENANT_ID }}
            subscription-id: ${{ secrets.AZURE_SUBSCRIPTION_ID }}
        - name: Install az ml extension
          run: az extension add -n ml -y

        # Deploy
        - name: Deploy
          uses: azure/arm-deploy@v1
          with:
            scope: resourcegroup
            failOnStdErr: false
            resourceGroupName: ${{ env.resource-group }}
            template: src\infra\main.bicep
The main difference here is that we’re using the `–what-if` flag to run a what-if deployment. This will show us what changes will be made to our Azure resources without actually making any changes. Before that runs we’re using the `az ml online-endpoint get-credentials` command to get the API key for the Azure Machine Learning endpoint and the `az keyvault secret set` command to store the API key and endpoint URL in the Key Vault.
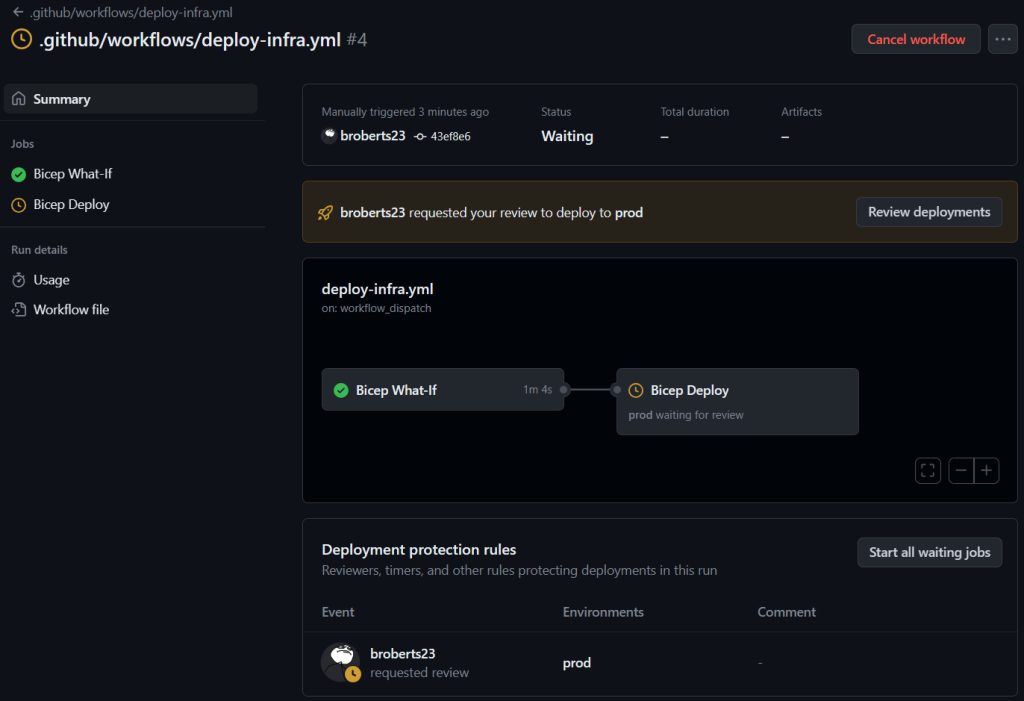
The pipeline will run a what-if deployment to show you what changes will be made to your Azure resources and then pause for manual approval. If you’re happy with the changes, you can approve the workflow and it will deploy the resources to Azure.

After deployment, we can validate that the API key and endpoint URL have been stored in the Key Vault and the App Service has been deployed and configured with the API key and endpoint URL.

Create a Flask web app
Next, create the following folder structure under `src`:
myapp/
├── myapp/
│   ├── __init__.py
│   ├── app.py
│   └── templates/
│       ├── index.html
│       └── result.html
├── requirements.txt
└── web.config
myapp/ is the root directory of your Flask app.
myapp/myapp/ is the package directory that contains your Flask app code.
myapp/myapp/__init__.py is an empty file that tells Python that the myapp/myapp/ directory should be considered a Python package.
myapp/myapp/app.py is the file that contains your Flask app code.
myapp/myapp/templates/ is the directory that contains your HTML templates.
myapp/myapp/templates/index.html is the HTML file for the form where users can enter values for the specified items.
myapp/myapp/templates/result.html is the HTML file that displays the result of the diabetes prediction.
myapp/requirements.txt is a file that lists the Python packages required by your Flask app. For example, if your app uses Flask and requests, your requirements.txt file should contain:
Flask==2.2.5
requests==2.31.0
myapp/web.config is a configuration file required by Azure to run your Flask app. Here’s an example web.config file you can use:
<?xml version="1.0" encoding="utf-8"?>
<configuration>
  <system.webServer>
    <handlers>
      <add name="httpPlatformHandler" path="*" verb="*" modules="httpPlatformHandler" resourceType="Unspecified" />
    </handlers>
    <httpPlatform processPath="%INTERPRETERPATH%" arguments="%INTERPRETER_ARGUMENTS%" stdoutLogEnabled="true" stdoutLogFile="\\?\%home%\LogFiles\python.log" startupTimeLimit="60" processesPerApplication="16">
      <environmentVariables>
        <environmentVariable name="PORT" value="%HTTP_PLATFORM_PORT%" />
        <environmentVariable name="PYTHONPATH" value="%HOME%\site\wwwroot" />
      </environmentVariables>
    </httpPlatform>
  </system.webServer>
</configuration>
The Azure Web App looks for app.py specifically to start Gunicorn. This file contains your Flask app code. The following code is an example of a Flask app that uses the Flask web framework to create a web app that accepts user input, sends the input to the deployed model, and displays the result. Azure provides sample code to query the model endpoint in the “Consume” tab of the model endpoint in the Azure ML portal.
from flask import Flask, request, render_template
import json
import os
import ssl
import urllib.request

app = Flask(__name__)


def allowSelfSignedHttps(allowed):
    # bypass the server certificate verification on client side
    if (
        allowed
        and not os.environ.get("PYTHONHTTPSVERIFY", "")
        and getattr(ssl, "_create_unverified_context", None)
    ):
        ssl._create_default_https_context = ssl._create_unverified_context


allowSelfSignedHttps(True)
# this line is needed if you use self-signed certificate
# in your scoring service.


@app.route("/", methods=["GET", "POST"])
def index():
    if request.method == "POST":
        # Get user input
        patient_id = request.form["PatientID"]
        pregnancies = request.form["Pregnancies"]
        plasma_glucose = request.form["PlasmaGlucose"]
        diastolic_blood_pressure = request.form["DiastolicBloodPressure"]
        triceps_thickness = request.form["TricepsThickness"]
        serum_insulin = request.form["SerumInsulin"]
        bmi = request.form["BMI"]
        diabetes_pedigree = request.form["DiabetesPedigree"]
        age = request.form["Age"]

        # Format input data
        input_data = {
            "input_data": {
                "columns": [
                    "PatientID",
                    "Pregnancies",
                    "PlasmaGlucose",
                    "DiastolicBloodPressure",
                    "TricepsThickness",
                    "SerumInsulin",
                    "BMI",
                    "DiabetesPedigree",
                    "Age",
                ],
                "index": [0],
                "data": [
                    [
                        patient_id,
                        pregnancies,
                        plasma_glucose,
                        diastolic_blood_pressure,
                        triceps_thickness,
                        serum_insulin,
                        bmi,
                        diabetes_pedigree,
                        age,
                    ]
                ],
            }
        }

        body = str.encode(json.dumps(input_data))
        # Get the AZURE_ML_ENDPOINT_URL environment variable passed from App Service Application settings
        url = os.environ["AZURE_ML_ENDPOINT_URL"]
        # Get the API_KEY environment variable passed from App Service Application settings
        api_key = os.environ["API_KEY"]
        if not api_key:
            raise Exception("A key should be provided to invoke the endpoint")

        # The azureml-model-deployment header will force the request
        # to go to a specific deployment.
        # Remove this header to have the request observe the endpoint
        # traffic rules
        headers = {
            "Content-Type": "application/json",
            "Authorization": ("Bearer " + api_key),
            "azureml-model-deployment": "mlflow-deployment",
        }

        req = urllib.request.Request(url, body, headers)

        try:
            response = urllib.request.urlopen(req)

            result = json.loads(response.read())

            # Display result
            if result[0] == 1:
                return render_template("result.html", result="The patient is diabetic.")
            else:
                return render_template(
                    "result.html", result="The patient is not diabetic."
                )
        except urllib.error.HTTPError as error:
            print("The request failed with status code: " + str(error.code))

            # Print the headers - they include the requert ID and the
            # timestamp, which are useful for debugging the failure
            print(error.info())
            print(error.read().decode("utf8", "ignore"))
    else:
        return render_template("index.html")


if __name__ == "__main__":
    app.run()
index.html is the HTML file for the form where users can enter values for the specified items. The following code is an example of an index.html file that contains a form with the specified items:
<!DOCTYPE html>
<html>
    <head>
        <title>Diabetes Prediction</title>
    </head>
    <body>
        <h1>Diabetes Prediction</h1>
        <form method="post">
            <label for="PatientID">Patient ID:</label><br>
            <input type="text" id="PatientID" name="PatientID"><br><br>
            <label for="Pregnancies">Pregnancies:</label><br>
            <input type="text" id="Pregnancies" name="Pregnancies"><br><br>
            <label for="PlasmaGlucose">Plasma Glucose:</label><br>
            <input type="text" id="PlasmaGlucose" name="PlasmaGlucose"><br><br>
            <label for="DiastolicBloodPressure">Diastolic Blood Pressure:</label><br>
            <input type="text" id="DiastolicBloodPressure" name="DiastolicBloodPressure"><br><br>
            <label for="TricepsThickness">Triceps Thickness:</label><br>
            <input type="text" id="TricepsThickness" name="TricepsThickness"><br><br>
            <label for="SerumInsulin">Serum Insulin:</label><br>
            <input type="text" id="SerumInsulin" name="SerumInsulin"><br><br>
            <label for="BMI">BMI:</label><br>
            <input type="text" id="BMI" name="BMI"><br><br>
            <label for="DiabetesPedigree">Diabetes Pedigree:</label><br>
            <input type="text" id="DiabetesPedigree" name="DiabetesPedigree"><br><br>
            <label for="Age">Age:</label><br>
            <input type="text" id="Age" name="Age"><br><br>
            <input type="submit" value="Submit">
        </form>
    </body>
</html>
result.html is the HTML file that displays the result of the diabetes prediction. The following code is an example of a result.html file that displays the result of the diabetes prediction:
<!DOCTYPE html>
<html>
    <head>
        <title>Diabetes Prediction Result</title>
    </head>
    <body>
        <h1>Diabetes Prediction Result</h1>
        <p>{{ result }}</p>
    </body>
</html>
Create a workflow to deploy the Flask app
Now create a workflow to deploy the Flask app. Create a new deploy-webapp.yml file in the .github/workflows folder with the following code:
on:
  workflow_dispatch:

permissions:
  id-token: write
  contents: read

env:
  AZURE_WEBAPP_NAME: mlflow-appservice # set this to your web application's name
  AZURE_WEBAPP_PACKAGE_PATH: 'src/web/myapp' # set this to the path to your web app project, defaults to the repository root

jobs:
  build:
    environment:
      name: 'prod'
    runs-on: ubuntu-latest
    steps:
      - uses: actions/checkout@v3

      - uses: azure/login@v1
        with:
          client-id: ${{ secrets.AZURE_CLIENT_ID }}
          tenant-id: ${{ secrets.AZURE_TENANT_ID }}
          subscription-id: ${{ secrets.AZURE_SUBSCRIPTION_ID }}

      - name: Set up Python 3.x
        uses: actions/setup-python@v4
        with:
          python-version: 3.x
      - name: Install dependencies
        run: |
          pip install -r src/web/myapp/requirements.txt
      - name: Deploy App
        uses: azure/webapps-deploy@v2
        with:
          app-name: ${{ env.AZURE_WEBAPP_NAME }}
          package: ${{ env.AZURE_WEBAPP_PACKAGE_PATH }}
      - name: logout
        run: |
          az logout
This workflow will deploy the Flask app to the App Service using the webapps-deploy action. The webapps-deploy action will zip the Flask app code and deploy it to the App Service.
After committing and pushing the code to GitHub, manually run the workflow to deploy the Flask app to the App Service.
We’re not going to win any awards for style here 🤣

but it works! 🎉

Conclusion
And that’s it! We’ve successfully deployed a working Web App that consumes our model. 🥳 Not only that but we’ve also created a CI/CD pipeline to store secrets in a Key Vault and used a managed identity to authenticate the web app to the Key Vault, completely removing any human interaction in the secret handling process. 🎉
This is the simplest minimum viable product (MVP) that I could come up with to demonstrate the functionality of consuming the model. For example you could:
- Add authentication to the web app.
- Add a database to the web app to store the results of the predictions.
- Develop a mobile app that consumes the model.
- Instead of having a user input the values for the specified items, you could use a camera to take a picture of the specified items and use Azure Cognitive Services to extract the values from the picture and send them to the deployed model.
- The possibilities are endless! 🤯
I hope you’ve enjoyed this series of blog posts and learned something along the way. I know I have! 🤓
If you have any questions or feedback, please feel free to reach out to me on LinkedIn
Thanks for reading! 👋


