Welcome to part two of my series on using MSIX App attach. For Part One, head over here.
In our previous blog we have discussed how to create the MSIX package from the packaging tool. This this post, it’s time for us to deploy the MSIX package to our AVD solution.
Pre-Requisites
To use this feature, the only key pre-requisite is an Azure file share in the same region as our hosts, integrated to AD and with the relevant permissions. We will be using this file share to host the MSIX images.
If you don’t already habe this configured, please follow the below steps from Microsoft to configure the required permissions for your MSIX app attach container.
Integrating Azure File share with Active Directory
Preparing vhd file and extracting the MSIX package
Assuming we have a working file share, the first step to use our MSIX package is to create a VHD, which we will extract the MSIX Package onto. This VHD should be large enough for our extracted application.
I’m using the below script to create a VHD in a host environment or you can manually attach a VHD to your packaging environment.
New-VHD -SizeBytes 500MB -Path c:\temp\vscode2.vhd -Dynamic -Confirm:$false
$vhdObject = Mount-VHD c:\temp\vscode2.vhd -Passthru
$disk = Initialize-Disk -Passthru -Number $vhdObject.Number
$partition = New-Partition -AssignDriveLetter -UseMaximumSize -DiskNumber $disk.Number

Once our VHD is ready, the next step is to extract our MSIX. To expand the MSIX image we need to use the msixmgr tool
After downloading the tool, use following cmdlet to unpack the MSIX into the your previously created VHD. .
.\msixmgr.exe -Unpack -packagePath “C:\temp\vscode_1.0.0.0_x64__rbh2ag737t0tm.msix” -destination “G:\vscode” -applyacls

Once complete, you can go ahead and detach the VHD file.
Next, we want to upload the VHD to our Azure hosted files share. (Which we created as a pre-requisite)


Depending on the size of your application and the resulting, VHD this may take some time.
Preparing MSIX package inside Azure Virtual Desktops
To use our created VHD within AVD, we need to enable the service in Azure Virtual Desktop. Within the management GUI, select the host pool and go to MSIX Packages.

Click add and provide the MSIX VHD path from the storage account.
Fill in the details and set state to Active

Note: While you can create an empty host pool, You need at least 1 server in your pool for this process to work
Adding MSIX app to an application group or desktop.
Now that you have attached your VHD, you can create or add the msix application (vscode) to an application or desktop group based on your preference.
If you would like the application to be available inside the virtual desktop, Add MSIX package to the “Desktop Application Group”. By default this is called: <Hostpool Name>-DAG

If you need application to be available as a remote app simply add the MSIX package to “Remote app application group”
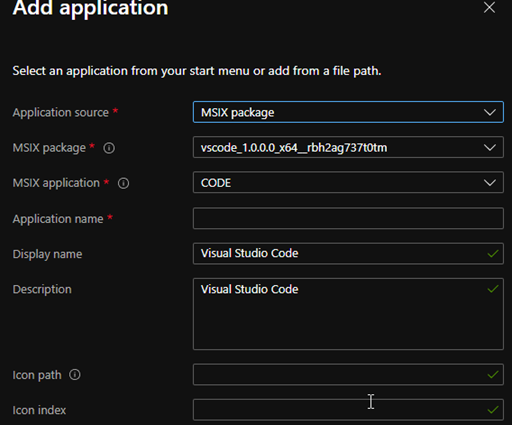
- Select the application group

- Select applications tab and add

- Select MSIX package from the application sources and fill the relevant details to the package
At this point, you’re all setup and should be able to test inside of the AVD sessions.


")


