This article describes how to add authentication for a Discord account to an Azure AD B2C custom policy.
Architecture
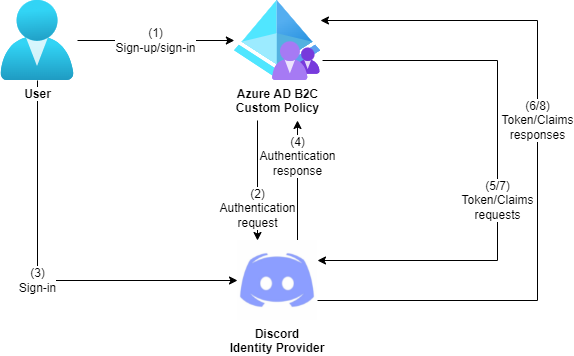
The following diagram illustrates the authentication flow for a Discord account to an Azure AD B2C custom policy.
For information about Discord and OAuth 2.0, see https://discord.com/developers/docs/topics/oauth2.
Prerequisites
- If you don’t already have one, then you must create an Azure AD B2C tenant that is linked to your Azure subscription.
- Prepare your Azure AD B2C tenant by creating the token signing and encryption keys and creating the Identity Experience Framework applications.
- Download one of the starter packs for Azure AD B2C from Microsoft’s GitHub repository.
Configure a Discord application
- Log in to https://discordapp.com/developers/applications/.
- On the Applications page, select New Application. In the Create An Application dialogue, enter an application name and then select Create.
- On the General Information page, select OAuth2.
- On the OAuth2 page, copy the Client ID field.
- On the OAuth2 page, select Reset Secret. In the Regenerate Secret Key dialogue, select Yes, do it! On the OAuth2 page, copy the Client Secret field.
- On the OAuth2 page, select Add Redirect, enter the following redirect URL and then select Save Changes:
- Redirect URL: Enter either
https://your-tenant-name.b2clogin.com/your-tenant-name.onmicrosoft.com/oauth2/authrespif you use the built-in domain orhttps://your-domain-name/your-tenant-name.onmicrosoft.com/oauth2/authrespif you use a custom domain for the Redirect URL field. Replaceyour-tenant-namewith your tenant name andyour-domain-namewith your custom domain.
- Redirect URL: Enter either
Add the client secret for the Discord application as a policy key
- Sign in to the Azure AD B2C portal.
- Select Identity Experience Framework.
- Select Policy keys.
- Select Add.
- In the Create a key section, enter the following fields and then select Create:
- Options:
Manual - Name:
DiscordClientSecret - Secret: Paste the Client Secret field that was copied in the previous section.
- Options:
Configure Discord as an identity provider
- Open the TrustFrameworkExtensions.xml file.
- Find the ClaimsProviders element. If it doesn’t exist, then add it to the TrustFrameworkPolicy element.
- Add the following ClaimsProvider element to the ClaimsProviders element. Replace
your-discord-client-idwith the Client ID field that was copied in the Configure a Discord application section.
<ClaimsProvider>
  <Domain>discord.com</Domain>
  <DisplayName>Discord</DisplayName>
  <TechnicalProfiles>
    <TechnicalProfile Id="Discord-OAuth2">
      <DisplayName>Discord</DisplayName>
      <Protocol Name="OAuth2" />
      <Metadata>
        <Item Key="client_id">your-discord-client-id</Item>
        <Item Key="authorization_endpoint">https://discord.com/api/oauth2/authorize</Item>
        <Item Key="AccessTokenEndpoint">https://discord.com/api/oauth2/token</Item>
        <Item Key="ClaimsEndpoint">https://discord.com/api/users/@me</Item>
        <Item Key="scope">identify email</Item>
        <Item Key="HttpBinding">POST</Item>
        <Item Key="BearerTokenTransmissionMethod">AuthorizationHeader</Item>
        <Item Key="UsePolicyInRedirectUri">false</Item>
      </Metadata>
      <CryptographicKeys>
        <Key Id="client_secret" StorageReferenceId="B2C_1A_DiscordClientSecret" />
      </CryptographicKeys>
      <OutputClaims>
        <OutputClaim ClaimTypeReferenceId="authenticationSource" DefaultValue="socialIdpAuthentication" AlwaysUseDefaultValue="true" />
        <OutputClaim ClaimTypeReferenceId="identityProvider" DefaultValue="discord.com" AlwaysUseDefaultValue="true" />
        <OutputClaim ClaimTypeReferenceId="issuerUserId" PartnerClaimType="id" />
        <OutputClaim ClaimTypeReferenceId="email" PartnerClaimType="email" />
      </OutputClaims>
      <OutputClaimsTransformations>
        <OutputClaimsTransformation ReferenceId="CreateRandomUPNUserName" />
        <OutputClaimsTransformation ReferenceId="CreateUserPrincipalName" />
        <OutputClaimsTransformation ReferenceId="CreateAlternativeSecurityId" />
      </OutputClaimsTransformations>
      <UseTechnicalProfileForSessionManagement ReferenceId="SM-SocialLogin" />
    </TechnicalProfile>
  </TechnicalProfiles>
</ClaimsProvider>
Add a user journey
- Open the TrustFrameworkBase.xml file.
- Copy the UserJourney element that includes
Id="SignUpOrSignIn". - Open the TrustFrameworkExtensions.xml file and find the UserJourneys element. If it doesn’t exist, then add it to the TrustFrameworkPolicy element.
- Paste the UserJourney element that was copied in step 2 to the UserJourneys element and replace the Id attribute for this UserJourney element from
"SignUpOrSignIn"to"DiscordSignUpOrSignIn".
Add the identity provider to the user journey
- Add the claims provider that was configured in the Configure Discord as an identity provider section to the user journey that was added in the previous section.
<OrchestrationStep Order="1" Type="CombinedSignInAndSignUp" ContentDefinitionReferenceId="api.signuporsignin">
  <ClaimsProviderSelections>
    ...
    <ClaimsProviderSelection TargetClaimsExchangeId="DiscordExchange" />
  </ClaimsProviderSelections>
  ...
</OrchestrationStep>

<OrchestrationStep Order="2" Type="ClaimsExchange">
  ...
  <ClaimsExchanges>
    <ClaimsExchange Id="DiscordExchange" TechnicalProfileReferenceId="Discord-OAuth2" />
  </ClaimsExchanges>
  ...
</OrchestrationStep>
Configure the relying party policy
- Open the SignUpOrSignIn.xml file.
- Replace the ReferenceId attribute for the DefaultUserJourney element from
"SignUpOrSignIn"to"DiscordSignUpOrSignIn".
<RelyingParty>
  <DefaultUserJourney ReferenceId="DiscordSignUpSignIn" />
  ...
</RelyingParty>
Upload and test the custom policy
- Upload all policy files in the following order to your Azure AD B2C tenant:
- TrustFrameworkBase.xml
- TrustFrameworkLocalization.xml
- TrustFrameworkExtensions.xml
- SignUpOrSignIn.xml
- Test the B2C_1A_signup_signin policy from your Azure AD B2C tenant.


")