Entra API-driven inbound provisioning streamlines the process of managing user accounts by providing a robust yet straightforward integration between your existing identity systems and Microsoft Entra ID. This guide highlights the simplicity and efficiency of implementing this feature.
As a former System Administrator, I’ve experienced firsthand how critical timely user provisioning is—and how frustrating it can be when HR forgets to notify IT about new hires until their start date or fails to communicate terminations promptly. API-driven provisioning addresses these issues by automating the entire process, ensuring accounts are created, updated, and disabled immediately and consistently.
Prerequisites
To use API-driven inbound provisioning, you’ll need:
- Microsoft Entra ID Premium P1 (or higher)
- (Commonly included in enterprise licensing.)
- Entra Cloud Connect (only required for provisioning to hybrid on-premises Active Directory)
- Access to an Azure Subscription (to create Logic Apps, Storage, and Key Vault resources)
Key Advantages
API-driven inbound provisioning simplifies user management compared to traditional synchronization methods, offering:
- Minimal Infrastructure: No need for heavy, server-side software.
- Real-Time Updates: Instantly creates, updates, and disables accounts.
- Flexible Integration: Easily connects with data sources like flat files, SQL databases, APIs, or SaaS platforms.
Licensing
API-driven inbound provisioning is included with your existing Microsoft Entra ID Premium P1 subscription, commonly held by many organizations. If you’re unsure about your licensing status, follow these steps:
- Navigate to Entra Portal | Overview.
- Confirm your subscription shows Premium P1 or higher.

Setting up Entra API Provisioning
Follow these steps to configure your Entra API-driven inbound provisioning:
Step 1: Configure the Entra Inbound Provisioning API Application
- Log in to the Azure Portal.
- Navigate to Entra Portal | Enterprise Apps.
- Select New Application and search for “API-driven provisioning”.
- Select the application according to your target (Entra ID or Active Directory).

Step 2: Connect Your Source System
Depending on your source data (such as an export to a CSV file or direct SQL database connection), set up the necessary Azure resources:
- Key Vault (to securely store connection details or credentials)
- Automation Account
- Storage Account (for flat file exports)
- Logic App

Step 3: Customize Logic App and Attribute Mappings
- Create a Logic App to transform your source data into SCIM payloads.
- Define custom attributes and configure the mappings within the provisioning settings.

Step 4: Enable Provisioning and Monitor Logs
- Activate the provisioning service and Logic App.
- Monitor provisioning activity through logs and diagnostics in the Microsoft Entra admin portal.

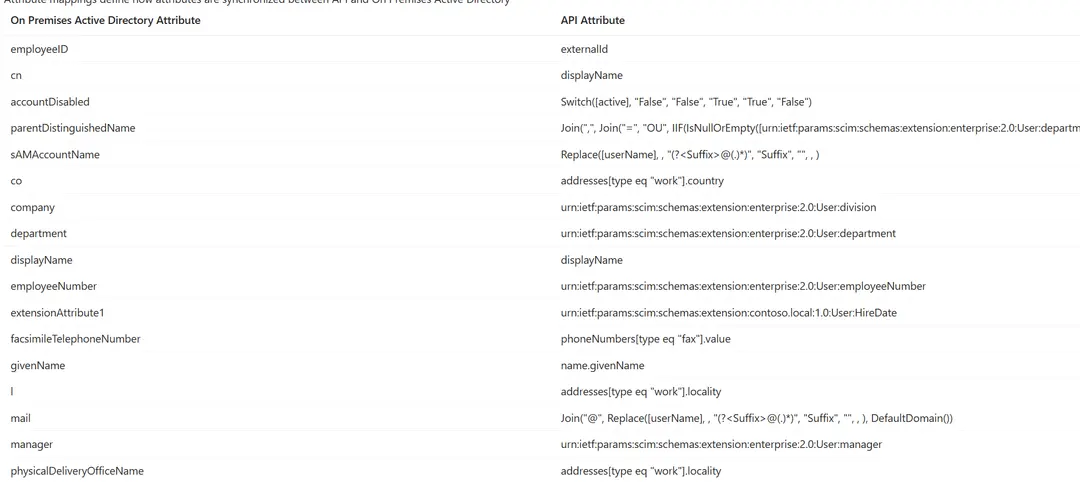
Attribute Mapping
Attribute mapping is straightforward and allows you to define clearly how your source attributes map to AD/Entra ID user properties. Typical mappings might include:
| Source Attribute | Entra Attribute |
username | userPrincipalName |
email | mail |
first_name | givenName |
last_name | surname |
employee_number | employeeId |
department | department |
You can manage these mappings via the Azure Portal:
- Open Azure Portal > Entra ID > Provisioning
- Select Attribute Mappings to configure custom mappings
Integrating with Logic Apps
Microsoft Logic Apps simplifies the integration process significantly, allowing quick and easy setups for provisioning workflows.
Flat File Integration
- Create a new Logic App in the Azure Portal.
- Set the trigger, e.g., “When a file is created or modified” in Azure Blob Storage or SharePoint.
- Parse your flat file (CSV/JSON) with the Parse JSON or Compose actions.
- Use the HTTP action to provision users in Entra ID via the Graph API.
Use a webhook
Many SAAS HR products such as “HiBob” allow webhooks which can trigger every time an employee record is modified or created.
- Create a new Logic App.
- Use the “When a HTTP request is received”
- Add a webhook to HIBob to trigger on record change https://apidocs.hibob.com/reference/employee-events-v2
- Get the employee data from the Rest API
- Create the BulkUser JSON from the employee data
- Use the HTTP action to provision users in Entra ID via the Graph API.
Here’s an example HTTP action configuration:
{
  "type": "Http",
  "runAfter": {
    "Get_Employee_From_HiBob": [ "Succeeded" ]
  },
  "inputs": {
    "method": "POST",
    "uri": "https://graph.microsoft.com/v1.0/$batch",
    "authentication": {
      "type": "ManagedServiceIdentity",
      "audience": "https://graph.microsoft.com"
    },
    "headers": {
      "Content-Type": "application/json"
    },
    "body": [
      {
        "bulkId": "@{guid()}",
        "data": {
          "active": true,
          "addresses": [
            {
              "locality": "@{body('Get_Employee_From_HiBob')?['work']?['address']}",
              "type": "work"
            }
          ],
          "displayName": "@{concat(body('Get_Employee_From_HiBob')?['firstName'], ' ', body('Get_Employee_From_HiBob')?['surname'])}",
          "externalId": "@{body('Get_Employee_From_HiBob')?['id']}",
          "name": {
            "familyName": "@{body('Get_Employee_From_HiBob')?['surname']}",
            "givenName": "@{body('Get_Employee_From_HiBob')?['firstName']}"
          },
          "phoneNumbers": [
            {
              "type": "work",
              "value": "@{body('Get_Employee_From_HiBob')?['work']?['phone']}"
            },
            {
              "type": "mobile",
              "value": "@{body('Get_Employee_From_HiBob')?['mobile']}"
            },
            {
              "type": "fax",
              "value": ""
            }
          ],
          "schemas": [
            "urn:ietf:params:scim:schemas:core:2.0:User",
            "urn:ietf:params:scim:schemas:extension:enterprise:2.0:User"
          ],
          "title": "@{body('Get_Employee_From_HiBob')?['work']?['title']}",
          "urn:ietf:params:scim:schemas:extension:contoso.local:1.0:User": {
            "HireDate": "@{body('Get_Employee_From_HiBob')?['work']?['startDate']}",
            "employeeLeaveDate": "@{body('Get_Employee_From_HiBob')?['work']?['endDate']}"
          },
          "urn:ietf:params:scim:schemas:extension:enterprise:2.0:User": {
            "department": "@{body('Get_Employee_From_HiBob')?['work']?['department']}",
            "division": "@{body('Get_Employee_From_HiBob')?['work']?['site']}",
            "employeeNumber": "@{body('Get_Employee_From_HiBob')?['id']}",
            "fax": "",
            "manager": {
              "value": "@{body('Get_Employee_From_HiBob')?['work']?['reportsTo']}"
            }
          },
          "userName": "@{concat(first(toUpper(body('Get_Employee_From_HiBob')?['firstName'])), body('Get_Employee_From_HiBob')?['surname'])}"
        },
        "method": "POST",
        "path": "/Users"
      }
    ]
  }
}
Conclusion
Entra API-driven inbound provisioning provides an efficient, low-maintenance solution to user management, leveraging familiar tools and your existing licenses. With straightforward attribute mapping, easy-to-use Logic Apps, and minimal setup requirements, your provisioning tasks can become simpler than ever.