

Disclaimer: This post was originally published on Azure with Danidu and has been reproduced here with permission. You can find the original post here.
Howdy Folks,
Let me tell you a story. I had a repository with 50+ YAML pipeline files organized neatly into folders – CI pipelines here, CD pipelines there, infrastructure pipelines over there. Beautiful structure. But then came the tedious part: importing each pipeline into Azure DevOps, one… by… one. Click “New Pipeline,” select the repo, choose the YAML file, name it, pick the folder, save. Repeat 50 times.
After about the fifth pipeline, I thought: “There has to be a better way.” So I did what any self-respecting DevOps engineer would do – I got bored and decided to automate it.
In this post, I’ll share the Azure DevOps pipeline that automatically discovers and imports all your YAML pipeline files into Azure DevOps with a single click. No more manual clicking, no more repetitive tasks, just pure automation bliss.
The Problem: Manual Pipeline Import is Mind-Numbing
If you’ve ever had to import multiple pipelines into Azure DevOps, you know the pain:
- Navigate to Pipelines > New Pipeline
- Select your repository
- Choose “Existing Azure Pipelines YAML file”
- Browse to find the YAML file (hope you remember where it is)
- Name the pipeline
- Select the target folder
- Save (or run)
- Repeat for every single pipeline
Now multiply that by 50, 100, or even more pipelines. Your afternoon is gone, and your soul has left your body.
The Solution: A Self-Contained Pipeline Creator
I created a fully automated solution that scans your repository for YAML files and creates all the pipelines in one go. The best part? It’s completely self-contained – no need to manually specify your organization, project, repository, or branch. It figures all that out from the pipeline context.
Key Features
- Self-Contained: Uses built-in Azure DevOps variables – zero manual configuration
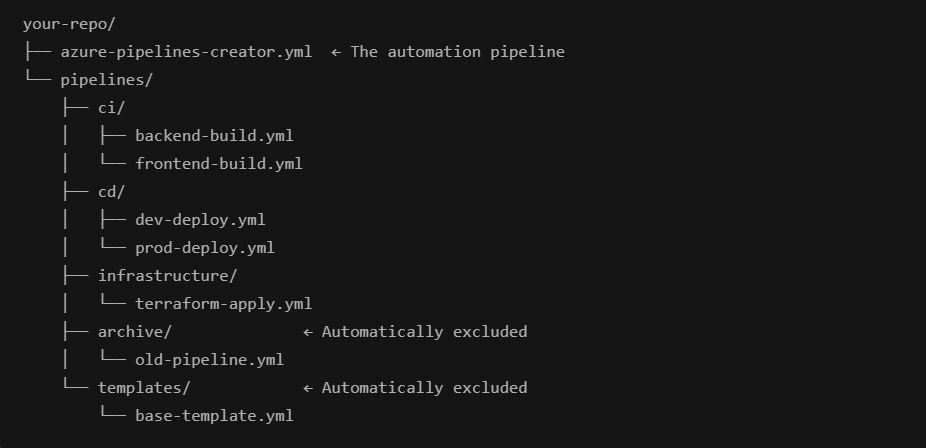
- Smart Discovery: Automatically finds YAML files while excluding template and archive folders
- Duplicate Protection: Checks for existing pipelines before creating duplicates
- Folder Structure Preservation: Maintains your repository hierarchy in Azure DevOps
- Dry Run Mode: Preview what will be created before committing
- Detailed Reporting: Clear statistics on created, skipped, and failed pipelines
How It Works
The pipeline is a compact 147-line PowerShell script embedded in an Azure Pipeline YAML file. Here’s the high-level workflow:
1. Initialization
The pipeline uses Azure DevOps built-in variables to configure itself:
It extracts everything it needs from the pipeline context:
- Repository URL:
$(Build.Repository.Uri) - Branch:
$(Build.SourceBranchName) - Organization:
$(System.CollectionUri) - Project:
$(System.TeamProject)
No more hardcoded values or pipeline parameters for these details!
2. YAML File Discovery
The PowerShell script scans your repository for YAML files with intelligent filtering:
$excludePatterns = @('*archive*', '*template*')
$yamlFiles = Get-ChildItem -Path $searchPath -Include *.yml,*.yaml -Recurse -File |
    Where-Object { $path = $_.FullName; -not ($excludePatterns | Where-Object { $path -like $_ }) }
This automatically excludes:
- Any folder containing “archive” (like
archive/,old-archive/,archive-2024/) - Any folder containing “template” (like
templates/,template-backup/)
You can also filter by specific subfolders using the subfolderStructure parameter.
3. Duplicate Detection
Before creating anything, the pipeline retrieves all existing pipelines and builds a lookup map:
$existing = @{} $pipelines = az pipelines list --output json | ConvertFrom-Json $pipelines | ForEach-Object { $existing["$($_.path)/$($_.name)".ToLower()] = $_ }
This prevents creating duplicate pipelines and makes re-running the pipeline safe.
4. Pipeline Creation
For each YAML file found, the script:
- Calculates the target folder path (preserving your repo structure)
- Checks if the pipeline already exists
- Creates the pipeline using Azure CLI
- Handles permission errors with detailed instructions
$args = @('pipelines','create','--name',$name,'--repository',$repositoryUrl, '--branch',$targetBranch,'--yaml-path',$yamlPath,'--skip-run') if ($queueId -gt 0) { $args += '--queue-id'; $args += $queueId } if ($targetFolder -ne '\') { $args += '--folder-path'; $args += $targetFolder } $result = & az $args 2>&1
5. Summary Report
At the end, you get a clear summary:
Repository: https://dev.azure.com/myorg/myproject/_git/myrepo | Branch: main Found 4 YAML file(s) SKIP: frontend-build (exists) CREATED: backend-build CREATED: dev-deploy CREATED: prod-deploy === SUMMARY === Created: 3 | Skipped: 1 | Failed: 0Getting Started in 3 Steps
Step 1: Grant Build Service Permissions
This is the only manual setup required. The Build Service account needs permission to create pipelines:
- Go to Project Settings > Pipelines
- Click the three dots (⋮) next to the root folder
- Click Security
- Add: [YourProject] Build Service ([YourOrg])
- Set “Create build pipeline” to Allow
Grant this at the root level, and it applies to all subfolders automatically.
Step 2: Organize Your YAML Files
Structure your repository with a dedicated folder for pipelines:
Step 3: Run the Pipeline
- Create a new pipeline in Azure DevOps pointing to
azure-pipelines-creator.yml - Run it with these parameters:
- gitFolderPath:
pipelines(folder containing your YAML files) - subfolderStructure:
*(scan all) orci,cd(specific folders) - azureDevOpsFolderPath:
\\(root) or\\Automated(custom folder) - dryRun:
true(preview first!)
- gitFolderPath:
- Review the dry-run output
- Run again with
dryRun: falseto create the pipelines
Real-World Example
Let’s say you have this repository structure:
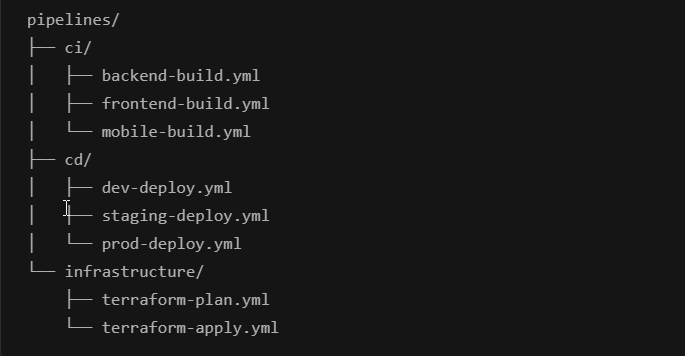
Run the pipeline with default parameters, and you’ll get this in Azure DevOps:
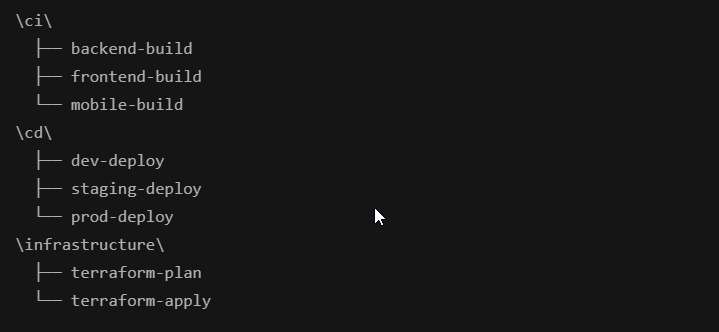
Your folder structure is preserved, pipeline names match your filenames (without the .yml extension), and everything is ready to run.
Key Code Snippet: The Core Logic
Here’s the heart of the automation – the pipeline creation loop:
foreach ($file in $yamlFiles) {<br> $relativePath = $file.FullName.Substring($searchPath.Length + 1)<br> $folder = Split-Path $relativePath -Parent<br> $targetFolder = if ($folder) { "\$($folder -replace '\\','\')" } else { $azureDevOpsFolderPath }<br> $name = [IO.Path]::GetFileNameWithoutExtension($file.Name)<br> $yamlPath = $file.FullName.Substring($workspacePath.Length + 1) -replace '\\','/'<br> $key = "$targetFolder\$name".ToLower()<br><br> if ($existing.ContainsKey($key)) {<br> Write-Host "SKIP: $name (exists)" -ForegroundColor Yellow<br> $stats.Skipped++<br> continue<br> }<br><br> if ($dryRun) {<br> Write-Host "DRY-RUN: Would create $name" -ForegroundColor Cyan<br> $stats.Created++<br> continue<br> }<br><br> $args = @('pipelines','create','--name',$name,'--repository',$repositoryUrl,<br> '--branch',$targetBranch,'--yaml-path',$yamlPath,'--skip-run')<br> if ($queueId -gt 0) { $args += '--queue-id'; $args += $queueId }<br> if ($targetFolder -ne '\') { $args += '--folder-path'; $args += $targetFolder }<br><br> $result = & az $args 2>&1<br> if ($LASTEXITCODE -eq 0) {<br> Write-Host "CREATED: $name" -ForegroundColor Green<br> $stats.Created++<br> } else {<br> $err = $result -join "`n"<br> if ($err -like "*Access denied*") {<br> Write-Host "##vso[task.logissue type=error]PERMISSION ERROR: Grant 'Create build pipeline' to Build Service"<br> }<br> Write-Host "FAILED: $name - $err" -ForegroundColor Red<br> $stats.Failed++<br> }<br>}
Use Cases and Benefits
1. Bulk Pipeline Creation
Onboarding a new project with 50+ pipelines? Import them all in one go instead of spending hours clicking.
2. Consistent Organization
Maintain your folder structure from repository to Azure DevOps automatically. No more manual folder selection and potential mistakes.
3. Incremental Updates
Added new pipeline YAML files to your repo? Re-run the automation – it only creates new pipelines, skipping existing ones.
4. Monorepo Management
Managing hundreds of microservice pipelines? This automation makes it effortless to keep everything synchronized.
Best Practices
- Always test with dry run first: Set
dryRun: trueto preview changes before creating anything - Grant permissions at root level: Apply Build Service permissions to
\so they cascade to all folders - Use descriptive names: Pipeline names come from your YAML filenames, so use clear, lowercase, hyphen-separated names
- Keep pipelines organized: Use a dedicated
pipelines/folder with logical subfolders - Re-run safely: The automation won’t create duplicates, so it’s safe to run multiple times
Limitations to Be Aware Of
- Creates only: Doesn’t update or delete existing pipelines (by design – safer!)
- Same repository: All pipelines reference the repository where the automation runs
- Current branch: All created pipelines use the branch where the automation runs
- No YAML validation: Doesn’t validate YAML syntax before creation (Azure DevOps will do that on first run)
- Sequential processing: Processes files one at a time (not parallel) – fine for most scenarios
Troubleshooting Tips
Issue: “Access denied”
Solution: Grant the Build Service account “Create build pipeline” permission in Project Settings > Pipelines > Security. Make sure to grant it at the root \ level.
Issue: “No YAML files found”
Solution:
- Verify
gitFolderPathexists in your repository - Check that files have
.ymlor.yamlextensions - Ensure files are committed to the current branch
- Try setting
subfolderStructure: *to scan all folders
Issue: “Pipeline already exists” for all pipelines
This is expected! The automation won’t create duplicates. If you need to recreate pipelines, delete them in Azure DevOps first.
Security Considerations
The automation uses secure, built-in Azure DevOps capabilities:
- Uses
$(System.AccessToken)with Build Service permissions only (no PAT required) - All actions are logged in Azure DevOps audit logs
- Build Service has limited, scoped permissions
- No secrets or credentials in the pipeline code
- Pipeline YAML files should be code-reviewed before import
Wrapping Up
This automation has saved me countless hours of repetitive clicking and has made pipeline management actually enjoyable. The initial setup takes 5 minutes, and from then on, bulk pipeline creation is a single click away.
The beauty of this solution is its simplicity – it’s a single YAML file with embedded PowerShell that leverages Azure DevOps’s built-in capabilities. No external tools, no complex setup, no maintenance burden.
If you’re managing multiple Azure DevOps pipelines, give this automation a try. Your future self will thank you when you’re not clicking through 50 pipeline creation wizards.
Get the Code
The complete pipeline automation is available in my GitHub repository: azurewithdanidu/import-ado-yml-pipelines-automatically
The repository includes:
- The complete
azure-pipelines-creator.ymlautomation pipeline - Sample pipeline YAML files to test with
- Comprehensive README with detailed documentation
- Quick start guide for getting started in 5 minutes
Next Steps
Try it out:
- Clone the repository or copy the pipeline YAML
- Grant Build Service permissions (one-time setup)
- Run a dry-run to see what would be created
- Create all your pipelines with a single click
- Enjoy your newfound free time
Have you automated any other tedious Azure DevOps tasks? I’d love to hear about your automation wins in the comments!
Happy automating, and may you never manually import a pipeline again!
**Additional Resources**:
– Azure Pipelines Documentation – https://docs.microsoft.com/azure/devops/pipelines/
– Azure CLI DevOps Extension – https://docs.microsoft.com/cli/azure/devops
– YAML Schema Reference – https://docs.microsoft.com/azure/devops/pipelines/yaml-schema
– Azure DevOps Build Service Permissions – https://docs.microsoft.com/azure/devops/pipelines/process/access-tokens
– DevOps Enhanced Release Automation with GitHub’s AI-Powered Release Notes – https://arinco.com.au/blog/devops-enhanced-release-automation-with-githubs-ai-powered-release-notes


