
In my previous blog, “Building a data protection strategy from the ground up“, I outlined the foundational phase defining key steps that should be completed to ensure a successful Microsoft Purview implementation and rollout
One of the steps mentioned is to discover and assess your organisational data so that you’ll understand what’s important, where it’s located, and how it’s being used. This step is critical, the ability to discover sensitive information enables much of Purview’s capabilities, including reporting of where sensitive data is stored, automated application of data labels, detection of inadvertent data loss events, and deliberate data exfiltration, to name a few.
Microsoft Purview has several capabilities to detect sensitive information, including several hundred built in detections including terms that encompasses finance, medical, and personal identifiable information, and trained detections based of a document type, such as agreements, legal agreements, and resumes. Whilst these built in detections are a great start, for best results, custom detections tailored to your organisations data should be created to improve the ability to detect data that’s important and to reduce false positives.
Getting to know the right people
Time to define what data requires protecting. Can only think of a few things? Drawing a blank? You’re not alone as I’ve seen this predicament many times. So, understanding what data needs protecting is a task that will most likely require input from others within the business. Lighten your load and find out who will be the right people best place to define your requirements. You can’t do this on your own.
So, remember, it’s not what you know, it’s who you know.
There may be someone who’s responsible for data governance, legal, compliance, or privacy requirements, and keep in mind data owners who are accountable for said data. Get to know these people, bring them along for the ride. They may be the difference between success and failure.
Get examples
Now that you’ve identified and got to know the right people, they can most likely point you in the right direction, and, importantly, they can provide examples of the data you’ll be protecting.
Why do you want examples?
These examples are what you’ll be able to use to start building your organisational specific detection capabilities to aide with discovery (and father down the line can enable automation capabilities)
What are the options?
Several, and each one has its own specific requirements to be configured and will have different use cases as to why you’d use it. Microsoft has made the following available to assist:
- Sensitive information types
- Trainable classifiers
- Document finger printing
- Exact data match
- Sensitivity labels
Sensitive Information Types
Sensitive information types (SITs) are the most common method. With more that 300 built in SITs, including those to detect finance, medical, and privacy information, it’s likely there’s several that can help, and you can use these as a starting point to build custom detections matching your unique requirements.
SITs can be simple, or they can become complex. In their simplest form, regex or keywords are used to match patterns and words to trigger detections. For more specific detection capabilities, SITs may require proximity, functions, case sensitivity, and exclusions to be configured.
SITs may also have multiple confidence levels. Give a higher confidence level to detections that produce less false positives, lower confidence if you’re observing more false positives. This is advantageous for activities such as data loss prevention, for example, a high confidence detection may trigger a block sharing action, whilst a low confidence might only trigger an alert.
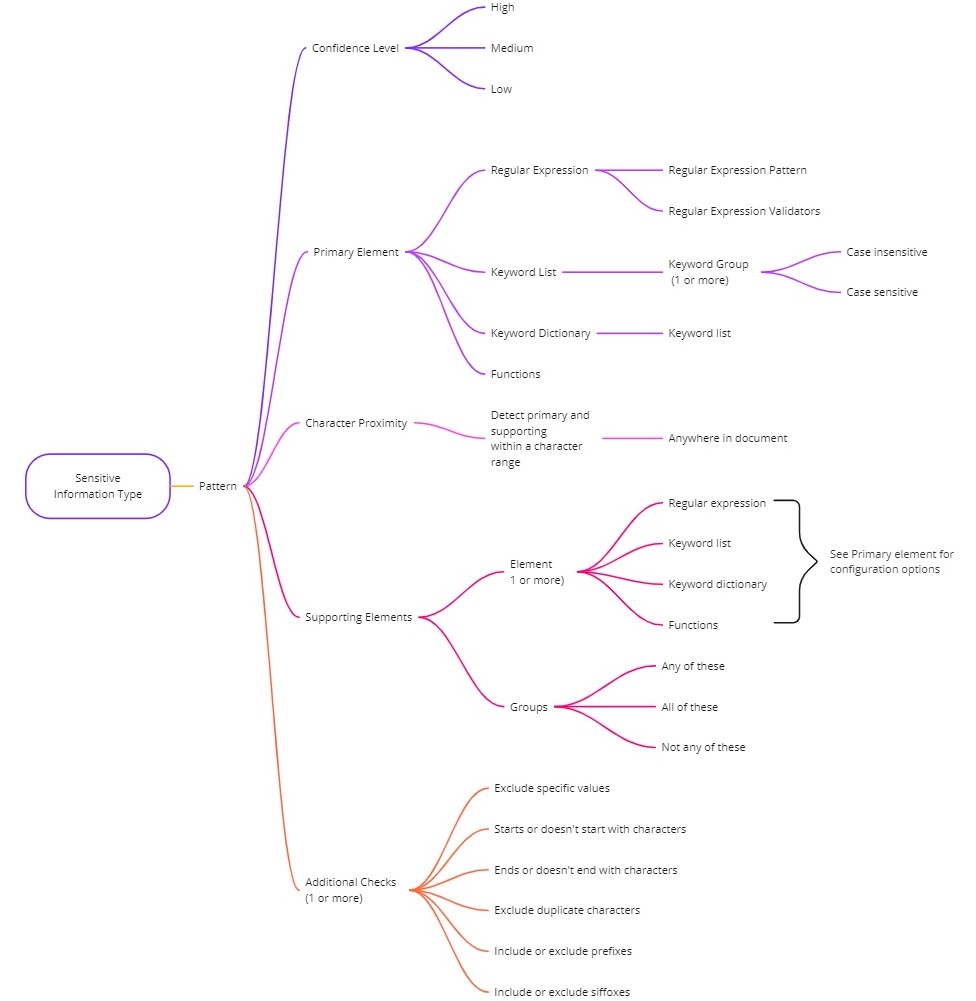
You’ll most likely create and use many SITs as part of your solution. They are flexible and provide many configuration options and combinations to match your requirements.
The below diagram highlights the many different ways you can configure sensitive information types.
Trainable Classifiers
Trainable classifiers are different from SITs, which use pattern matching, and instead performs detections based on the item type. Example of what constitutes an item include resumes, source code, and statement of works.
Microsoft provides several pre-trained classifiers already built and ready to detect over 100 item types. In addition, you can train your own classifiers to be able to detect items specific to you. To create your own custom trainable classifiers, you will require example data that will then be used to train your model. This example data needs to contain positive and negative samples, both samples are used to train the model what it should look for and what it should disregard, and this may require your input to assist the process and help guide the training. Once the process is complete, and you’re happy with the results, the classifier can be published and used to assist with automatic labelling, to trigger data loss prevention rules, or apply retention labels.
Document Finger Printing
Document finger printing performs detections by understanding a document template which is then converted into a sensitive information type (SIT). For certain types of information, such as a standard form or template, document finger printing has very good detection capabilities.
A document template is a document structure containing unique word patterns which identify what type of document it is, and this could then infer the document sensitivity. Whilst each document built of a template varies with the additional data it contains; the original template remains either close to the original or the same as the original. It’s the structure and content of the original template data is what enables the detection.
There is flexibility on how you want detections occur, either partial matching matched with a confidence level, which may be ranging from low to high, or exact matching where there is a high confidence, and the text from the template must match the original fingerprint.
Document finger printing can be used to match data loss prevention rules, at this point in time it won’t with other Purview capabilities such as automated labelling,
Exact Data Match
Exact data match is an extension of a sensitive information type (SIT) that then utilises a database containing rows of information that can detect very specific combinations of data. The SIT is used to perform the initial detection, which is then used to reference rows within the data base.
Exact data match works well in scenarios such as information relating to customers or specific information stored within a data source. For example, customer information including name and address. Exact data match may trigger on the name; however, a detection may then require a specific address associated with the name.
To use exact data match, you’ll need an extract of the source data you want to be included in detections which then needs to be uploaded to a Microsoft service that will host this data. As the source data will change over time, this should be an automated and regular update to ensure the source data is up to date and relevant.
Exact data matching can be used to detect data in several scenarios, including data loss prevention, auto labelling, insider risk management, and eDiscovery.
Sensitivity Labels
Applying a label to data is one of the best methods to detect and track and control the use of information. Whilst labels can leverage SITs, classifiers, and exact data match to suggest or automatically apply a label, this isn’t always practical as you need to build a detection capability for each scenario. Therefore, applying a default label or applying the relevant label at or after creation is a great way to integrate into Purview capabilities such as data loss prevention, or Insider Risk Management with the ability to track and alert when an unusual number of labels have their priority lowered (i.e., someone changing labels from confidential to general for the purpose of exfiltration) might be the right way forward.
Labels can also be applied to SharePoint and Teams and can be used to enforce controls such as blocking external sharing of documents from the SharePoint or Teams location or integrate with conditional access so that access to information can be restricted or allowed depending on a predefined set of conditions.
Which should I use?
Use whatever capabilities that enables you to discover and assess your data.
There’s no science to it, once you gather and analyse example data it will then become apparent which will work best. Information containing specific keywords or terms and phrases might be best represented using sensitive information types, documents using a standard template could be a candidate for document finger printing. Information of a particular sensitivity stored in a specific location, then applying labels could be the simplest method.
Take the first step forward
If you need assistance, Arinco can help. With our Security Done Right and Data Protection Accelerator offering, we work closely with your team to assess your environment and implement the right data protection capabilities to meet your objectives and goals.


