Azure Compute Gallery previously known as Shared Image Gallery (SIG) service has the new Azure VM Applications features and additional capabilities.
With VM Applications, you can now define application packages, replicate, share and deploy them automatically to your VMs and Virtual Machine Scale Sets using ARM templates, the portal, CLI, or PowerShell. You can also add an application to a VM or VMSS at creation, or add, remove, and update applications on existing resources.
This feature provides flexibility and simplicity in managing, sharing, and deploying applications. Some features include:
- Provides custom configuration of applications at deployment time
- Require applications or specific versions through DeployIfNotExist policies
- Create multiple replicas per region for reliability
- Limit which VMs and VM scale sets can install an application
And this does not charge you anything extra for the service. Its only charge you for the storage. Even though this sounds interesting to you, keep in mind this feature is still in preview and not production ready yet. Also, there are heaps of other limitations. I’m pretty sure the MS Engineering team will come back with solutions in future for sure
Some limitations
- No more than 3 replicas per region: When creating a VM Application version, the maximum number of replicas per region is three.
- Retrying failed installations: Currently, the only way to retry a failed installation is to remove the application from the profile, then add it back.
- Only 5 applications per VM: No more than 5 applications may be deployed to a VM at any point.
- 1GB application size: The maximum file size of an application version is 1GB.
- No guarantees on reboots in your script: If your script requires a reboot, the recommendation is to place that application last during deployment. While the code attempts to handle reboots, it may fail.
- Requires a VM Agent: The VM agent must exist on the VM and be able to receive goal states.
- Multiple versions of the same application on the same VM: You can’t have multiple versions of the same application on a VM.
Let’s see How to deploy Azure VM Applications features.
To get on with this solution you need an Azure Compute Gallery present (previously known as a shared image gallery). If you already have one you are good to go. If not create one as per this
Step 1
The first step is to create an Application Definition (VM application definitions are created within a gallery and carry information about the application and requirements for using it internally. This includes the operating system type for the VM application versions contained within the application definition.)
Using GUI
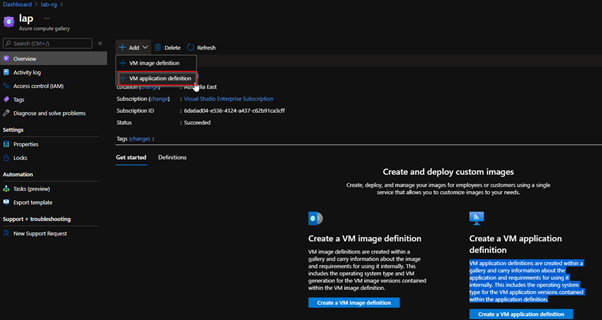

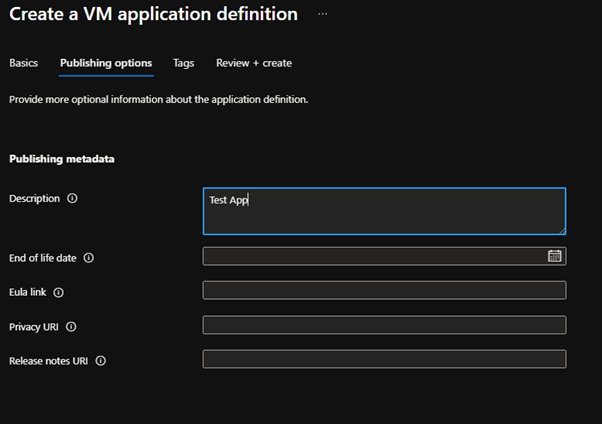
Using PowerShell
Use the below code to create an application image definition
$applicationName = myApp
New-AzGalleryApplication `
  -ResourceGroupName $rgName `
  -GalleryName $galleryName `
  -Name $applicationName `
  -SupportedOSType Windows`
  -Description "Windows app."
Step 2
Using GUI
Browse the image definition you created above and create a version of the image.
Few things to highlight here
- Image exe/msi file needs to be saved in a storage account which can be accessed via both VM and image gallery
- When writing the install script you need to consider the package location in the VM as below
The download location of the application package and the configuration files are:
- Linux:
/var/lib/waagent/Microsoft.CPlat.Core.VMApplicationManagerLinux/<appname>/<app version> - Windows:
C:\Packages\Plugins\Microsoft.CPlat.Core.VMApplicationManagerWindows\1.0.4\Downloads\<appname>\<app version>
The install/update/remove commands should be written assuming the application package and the configuration file are in the current directory.
You can all add a custom configuration file with the application. But in my case, I’m doing a basic installation of the application
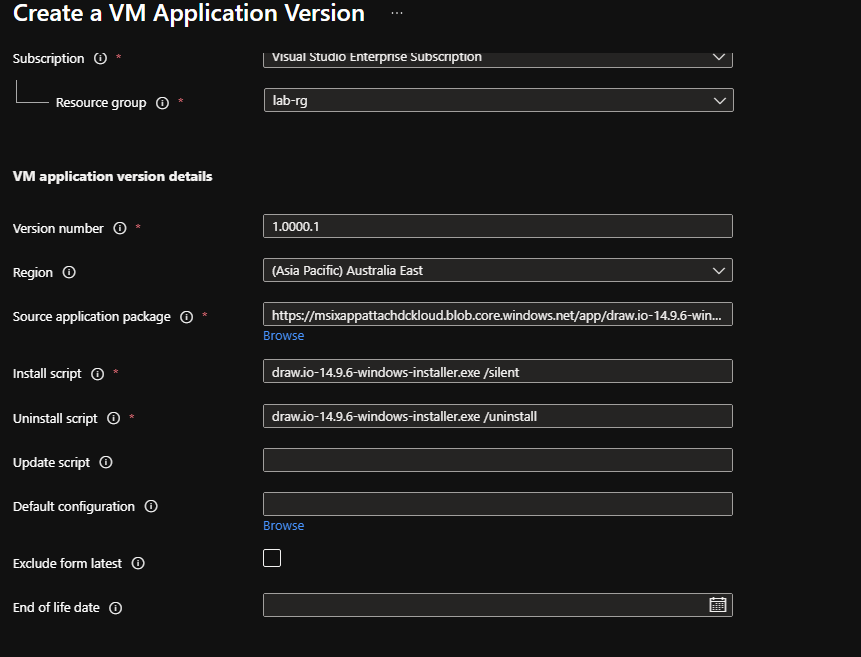

And then just hit Create.
Using Powershell
use the below code and update it with your own parameters.
$version = 1.0.0
New-AzGalleryApplicationVersion `
   -ResourceGroupName $rgName `
   -GalleryName $galleryName `
   -GalleryApplicationName $applicationName `
   -Name $version `
   -PackageFileLink "https://<storage account name>.blob.core.windows.net/<containder name>/<filename>" `
   -Location "Australia East" `
   -Install myApp.exe /silent `
   -Remove myApp.exe /uninstall `
Once the deployment is complete

Let’s see How to Apply to a Virtual Machine
You can attach this application either to a new VM or to an Existing Virtual Machine
New VM
Simply try to create a new virtual machine in the advance section you can select this preview feature


Existing VM
As of now, there is no option for us to install the application to an existing VM using GUI. Instead you can use the below PowerShell to add the application
$vm = Get-AzVM -ResourceGroupName $rgname -Name myVM
$vmapp = Get-AzGalleryApplicationVersion `
   -ResourceGroupName $rgname `
   -GalleryName $galleryname `
   -ApplicationName $applicationname `
   -Version $version

$vm = Add-AzVmGalleryApplication `
   -VM $vm `
   -Id $vmapp.Id

Update-AzVm -ResourceGroupName $rgname -VM $vm
My Views on this new feature
To be honest. this feature is not yet ready to be used in production but has a huge potential to replace some of the heavy management solutions like SCCM.
This will bring the same complexity of managing application versions. On the other hand if you are trying to move away from your on prem infrastructure this feature will come in very handy when this goes live.
For more details and updates
https://docs.microsoft.com/en-gb/azure/virtual-machines/vm-applications


