
Recently I was involved in a project to migrate one Microsoft 365 tenant into another as part of a merger & acquisition effort. This included all workloads such as:
- Identities
- Exchange
- SharePoint
- Teams
- Teams’ chats
- OneDrive
- Microsoft 365 Groups
- Other (Power BI, Power Platform, Enterprise Apps, etc…)
During our discovery phase we investigated a few tools, in the end we chose AvePoint’s Fly tool. There were a few reasons for this including an advanced feature set, solid documentation and 24/7 support. Overall, the migration went well, but there were some key learnings, and this blog will discuss these in a bit more detail.
I am going to refer to “destination” and “source” users. The destination users will be in the end state tenant while source users will refer to the tenant being migrated.
Identities
Approach
The approach taken was to synchronise all objects from the on-premises Active Directory to the source, as well as the target tenant, with Entra Connect. Since Microsoft only allows write-back from one tenant, write back from the target tenant was initially disabled. The benefit here was that all required objects were synced to the target tenant and therefore automatically provisioned. (Note: several additional steps are required which we will not go into here.)
A DNS domain can only live in one tenant, which meant we were dealing with a cut-over migration, needing to be executed over a long weekend. Just prior to the domain cut-over, when the DNS Domain gets removed from the source, we disabled write-back from the source and temporarily stopped synchronisation to prevent Entra Connect writing to objects in the source during the domain removal process.
After the domain was removed, synchronisation to the source was enabled again with write-back disabled.
As a next step the DNS domain was added to the target tenant and verified. The final step was to enable write-back synchronisation in the target tenant with Entra Connect and run a full (or initial) synchronisation.
Challenge
The biggest challenge we encountered here was when it came time to remove the domain from the source tenant. It was decided that a less critical domain would be removed first. This domain was used by about 90 objects. The remove domain option here worked flawlessly, so we had confidence when removing the larger domain (about 4000 objects). It successfully removed around 600 objects before it failed. The solution came in the form of an unconventional approach.
We were offered 2 possible solutions:
- Break Entra sync
- Stop syncing all objects
With solution 1 we would have had to run a PowerShell command

This would have set all objects to cloud only. The next step would have been to use PowerShell to change all the objects in scope to use the tenant onmicrosoft domain (UPN, proxy, SIP etc…).
While there is the option to reverse this using

it was decided that this approach was too risky and too much work was required in creating and using the PowerShell approach (it was close to midnight at this point).
So, we decided to go with option 2. The approach here is to adjust your Entra Connect sync to only sync one OU in Active Directory with a single contact object. Here all objects are soft deleted, and this allows for the domain to be removed from the tenant. Once the domain is removed, Entra Connect sync is changed back to its original settings and all objects are restored except specific non-synced settings like MRM policies. The restored objects are now using the ‘onmicrosoft’ domain.
The latter approach seemed much safer.
Exchange
While this seemed to be the most straightforward platform, it did have a few elements of surprise. The AvePoint Fly migration tool supports a large variety of objects including:
- contacts
- mail items
- notes
- rules
- calendar items
- journals
- tasks
- auto-complete lists
- recoverable items
- permissions
The one thing to call out here (depending on how much data you are migrating) is to migrate primary mailboxes separately and another job to migrate the associated archive mailboxes.
In my experience, when it came to mapping the objects, it was decided to map using the tenant ‘onmicrosoft’ domain rather than the UPN. This allowed for no changes being required post domain cutover nor any interruption during cutover.
Note: when using the original onmicrosoft name this may result in duplicates and conflicts in the target tenant.
SharePoint
SharePoint didn’t come with too many surprises although I found that there were a few errors relating to file size discrepancies, throttling due to file size, lookup column issues & conflicting files. In all these cases AvePoint provides a customised feature you can use in the policy to either ignore or overrider these errors.
The tool supported several objects including
- structure
- content
- subsites
- site collection and site features
- site and list content types
- site collection and site settings
- navigation, branding and theme
- site and list columns
- managed metadata service
- apps
- list and libraries
- settings
- public views
- power apps
- folders, files, items & list attachments
- modern web parts and pages
- classic web parts and pages
- site, list, content and shared links permissions
- workflow definitions
The biggest lesson learnt here was not to pre-create objects in the target. Let the tool create the sites. The benefit here is that all site settings, formats, regional settings and storage settings will be maintained.
I also found that the tool didn’t migrate all documents and either manual intervention was required or migrating in smaller batches was required. This was due to several reasons and was especially true when there was a lot of metadata. If the target site didn’t have all the metadata migrated, it would not migrate some files. I found in these cases that migrating at a folder level rather than a site collection level was the best work around.
Pre-migration will throw several errors relating to permissions. This will be due to the fact users and groups may either not have been migrated yet or the objects are using the ‘onmicrosoft’ domain in the target. After domain cutover you can run a “permissions only” migration.
Teams
In my experience, this platform was by far the most seamless. It delivered on its promises. Like SharePoint, there were occasional issues such as file size discrepancies, throttling, lookup column challenges, and conflicting files. However, the ability to customize features made it possible to bypass or override these errors when necessary.
The tool supported several objects including
- apps
- channel conversations
- tabs
- tags
- planner
- shifts
- membership (including guests)
- meeting recordings
- external users
- all messages and hierarchy
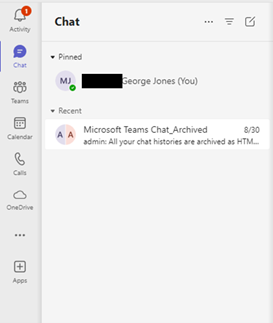
- option to archive to HTML in the channel folder
- group mailbox
So what lessons were learnt? Like SharePoint, don’t pre-create objects in the target. Let the tool do all the work.
When configuring the mappings, the mapped object needs to use the primary object domain (or UPN). If you don’t it will throw an OBDC error stating it cannot find the object in the source\destination. This does mean that after domain cutover you will need to change the mapping domains and re-authorise the delegated app. But more on that later.
Pre-migration will throw several errors relating to permissions. This will be due to the fact users and groups may either not have been migrated yet or the objects are using the ‘onmicrosoft’ domain in the target. After domain cutover you can run a “permissions only” migration.
Teams’ chats
I gained the most insights from this experience. In the end, the chosen approach proved to be the best, resulting in minimal issues.
The tool supported several objects including
- recreate chat messages in Teams
- archive all chat messages to HTML
- synchronise the pinned/unpinned status of chat messages
- migrate external users
- migrate chat tabs
- migrate chat file attachments
Now from the above list we are presented with 2 approaches (or a combination of both)
- recreate chat messages in Teams
- archive all chat messages to HTML
- recreate chat messages in Teams on or after a certain date and archive to HTML all others
All the approaches above have their benefits (and downfalls). These were the considerations:
Approach 1 – recreate chat messages in Teams
From the outside, this seemed like the best approach. It allowed for all chats to be recreated with all the messages, content, images, gifs, reactions, tabs and apps. But it did have some downfalls:
- all chats are marked as unread
- all 1:1 chat become group chats
- the service account & consent user become members of the chat
- chat members (internal & external) get new chats created in their Teams
- certain apps were not migrated
It also had some benefits:
- chat group names are preserved
- meeting chats are migrated
- meeting recordings are migrated
- structure, mentions and files remain the same
AvePoint provides a tool to mark all chats as read, as well as a tool to remove the service account & consent user, but these just show as “leaving the chat” rather than removing them altogether.
If a user interacts with an app in the source chat, the app will send a message to the source user during the migration or discovery process.
If a user is mentioned in a message in the source chat, the destination user of the mentioned user will receive a notification during the migration.
If a message is marked as Urgent in the source chat, notifications will be sent repeatedly to the migrated chat in the destination until the chat is read.
If you decide on this approach, be sure to communicate to all internal and external members that they will receive new chats.
Approach 2 – archive all chat messages to HTML
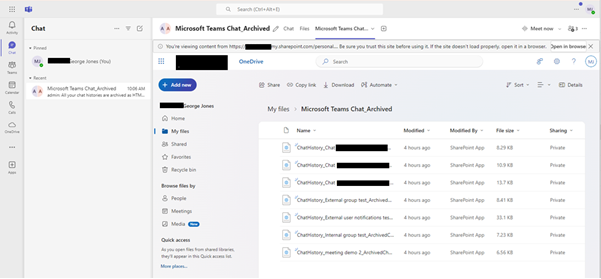
Initially I didn’t like the idea of users not having their chats recreated. This option gives the user a blank Teams chat except for one. Here a chat is created with a link to the users OneDrive where the HTML files are stored. This option had some benefits:
- no messy chats to clean up
- no unnecessary notifications or chats
- no service accounts or consent users to remove
- search (including attachments) are preserved
In the end we decided to go with this approach. It provided the user with no disruption while still being able to search archived chats. Links and attachments were preserved in the search function which made this a great option.
So what lessons were learnt? The user needs to first have the destination OneDrive provisioned and ideally have their OneDrive migration finished before running the Teams chat migration.
Like Teams, when configuring the mappings, the mapped object needs to use the primary object domain (or UPN). If you don’t it will throw an OBDC error stating it cannot find the object in the source\destination. This means after domain cutover, you will need to change the mapping domains and re-authorise the delegated app. But more on that later.
Test, test and then test some more. I found that I needed to run various test scenarios to provide the business with the right information to make the best decision. These are some of the scenarios I tested and documented:
- migrate all chats
- external users experience
- internal user external 1:1 chat (with a shared file)
- internal user external 1:1 chat (source and destination users)
- external group chat (with @ mention)
- external group chat (with @ mention & multiple external participants)
- internal user external 1:1 chat (with @ mention)
- internal user Teams channel (with @ mention)
- archive all chats
- archive chats and external user experience
- archive chats and destination user experience
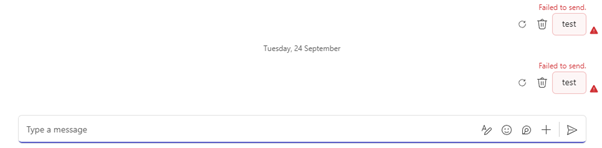
Once the users were migrated, the destination users (now internal users) had a surprise. Chats to the source users still showed in Teams but any new messages resulted in a “failed to send” state. This in a way was great because the user now knew this chat was obsolete and a new chat needed to be established.
For external users the experience was a little different. Chats to source users, post domain cutover as active, and messages could be sent. A keen eye would reveal that the users UPN reflects the onmicrosoft domain and therefore technically is delivering messages to the old users in the source tenant. To get around this we removed the Teams license option in the source tenant. This resulted in the same experience mentioned above where new messages to old chats resulted in a “failed to send” state. In addition, we set an out of office message for all users with a message that the user had been migrated and to start a new chat.
Note: Links shared “with anyone” will no longer work post migration.
OneDrive
This also proved to be largely without issue. Within the tool there were few errors or exceptions. When comparing OneDrive contents between source and destination, I could not notice anything missing.
The tool supported several objects including
- all OneDrive content
- default content only
- meeting recordings
- direct permissions
- shared links
Like Teams and Teams chats, when configuring the mappings, the mapped object needs to use the primary object domain (or UPN). If you don’t, it will throw an OBDC error stating it cannot find the object in the source\destination. This does mean that after domain cutover you will need to change the mapping domains and re-authorise the delegated app. But more on that later.
Shared links with both shared “with me” and “by me” were intact and the links were updated. In the migration policy you need to set the final domain so the links reflect that.
Microsoft 365 Groups
Initially this also seemed like an easy job without issues, however this enterprise used Microsoft 365 Groups a little differently.
The tool supported several objects including:
- planner
- membership (and optionally guest users)
- all SharePoint site data or only default documents library
- group mailbox
There are two options when migrating Microsoft 365 Groups:
- Configure a SharePoint site migration (which migrates the connected M365 group)
- Configure an M365 group migration (which migrates the connected SharePoint site)
While in most cases option 1 would be the better option, there are some cases where option 2 would be the best choice. Typically, a Microsoft 365 group is attached to a SharePoint site by default to control membership. However, it also functions as a shared workspace for email, files and resources.
The workspace for email is what I want to focus on when choosing your migration method. As a Microsoft 365 group can be used as a distribution list, option 1 will not necessarily migrate the mail items.
In this case a Microsoft 365 Group migration (option 2) would be the preferred method here.
The SharePoint module within Fly is solely for migrating Site collections and objects inside its site collection while the Microsoft 365 Group module will be able to migrate the Group’s mailbox and its associated SharePoint site.
Post Cutover
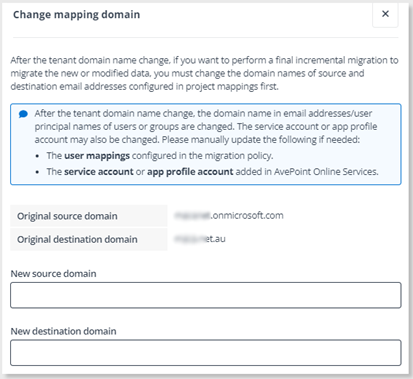
Once the domain has been moved to the new tenant, you need to change your mapping domains for Teams, Teams chat & OneDrive objects. Fortunately, the tool has a built-in option to quickly update all mappings.
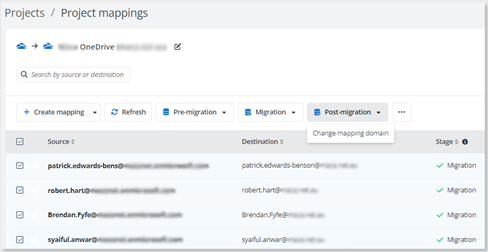
Once the mappings have been updated, you do need to re-authorise the delegated app and this requires an account with Global Admin rights (this is only used for Teams chats).
Once done you can now run incremental synchronisations.
Fly tool permissions
For this project, we configured the following:
- source tenant custom app registration
- destination tenant custom app registration
- destination tenant custom app registration (delegated)
- source and destination tenant service account
- certificates for authentication
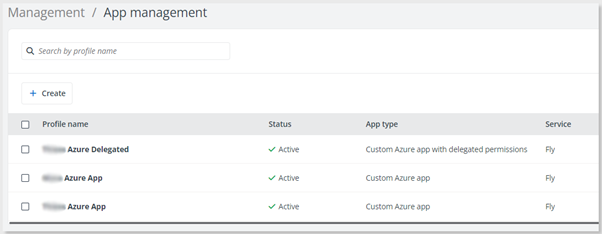
For the source and destination custom app registration, I was able to use my privileged user account to authorise the app in AvePoint. My account was not a Global Admin. For the delegated custom app, we needed an account with Global Admin in the destination tenant to authorise the app.
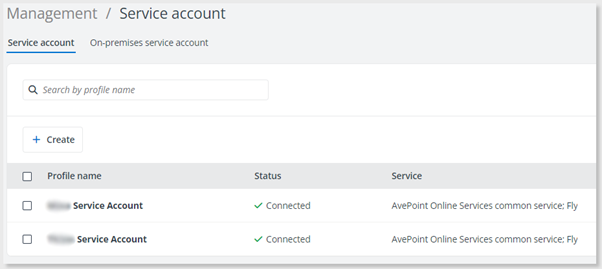
The service account needed to be licensed for the workloads it will be involved with, as well as the required Admin roles. In our case this was just for Teams and SharePoint and had an E3 or E5 license assigned. The account also needs to be excluded from any MFA policies.
The service account also needs to be assigned to a custom admin role in the Exchange admin center. The required permissions are:
Source Tenant Permissions:
- Application exchange full access
- Application mail full access
- Application Impersonation
- Mail recipients
Destination Tenant permissions:
- Mail recipients
For Teams chat you also need a placeholder (or dummy) account. This account does not need to be licensed nor have any admin roles assigned.
| Tenant | Platform | Custom app | Service account | Delegated app | Placeholder account |
| Source | Exchange | Yes | Yes | ||
| Destination | Exchange | Yes | |||
| Source | SharePoint | Yes | Yes | ||
| Destination | SharePoint | Yes | Yes | ||
| Source | Teams | Yes | Yes | ||
| Destination | Teams | Yes | Yes | ||
| Source | Teams Chat | Yes | |||
| Destination | Teams Chat | Yes | Yes | Yes | |
| Source | OneDrive | Yes | Yes | ||
| Destination | OneDrive | Yes | Yes | ||
| Source | M365 Groups | Yes | Yes | ||
| Destination | M365 Groups | Yes | Yes |
Other considerations
Citizen developer (or user) Forms, flows & power apps are not supported – these need to be migrated by the user that owns them.
Power Platform migration is available as an option but requires an add-on license. I did not migrate any Power Platform components during this migration so I can’t comment on how that went.
Planner is not supported in the migration unless it is linked to a Team. If you export the planner to Excel, you can then use Power Automate to create the tasks. This does have some limitations:
- Your start and end dates need to be in UTC format (no blank cells)
- It does not import status (labels)
- It does not import comments
- It does not import attachments
- It does not import task steps

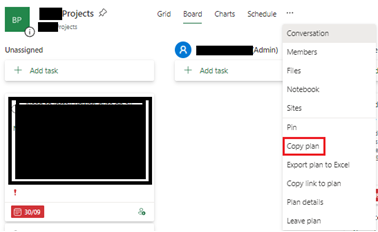
The other option is to attach the Planner Plan to an existing or temporary Team. Within the Plan, select 3 dots menu and select “Copy plan”. Then select the Microsoft 365 Group attached to a Team and copy. You can then go to the Team and add it there.

Migrate the Team and the Planner will be migrated. Some limitations here also:
- It does not migrate the tasks assigned person (it does migrate members)
- It does not migrate the tasks progress (status)
- It does not migrate attachments
Support
While good, there could be some improvements. Submitting a ticket can take a while to get a proper answer.
Always make use of the severity scale. This will determine the response time and level of support you will receive. By default, it is set to 3.

When it comes to urgent or critical issues it’s a good idea to get your account exec involved. Leading up to cutover, it’s a good idea to get your account exec on board to ensure a smooth experience.
Conclusion
Overall, the migration was a success, but as most migrations it had a few curve balls. If I were to do it again the following tips would have made post migration a lot smoother
- Does the target tenant have any contact objects that will cause conflicts
- Does the source tenant use M365 groups as distribution groups
- Does the source tenant use M365 groups for email\file storage
- Run an item check on M365 groups to check how many items they have
- Migrating SharePoint sites with M365 groups doesn’t necessarily migrate mail items
- Make sure all users OneDrive is syncing
While using a solid tool can make your migration successful, those using the tools are just as essential.
Looking to consolidate or considering a merger\acquisition? Reach out to see how Arinco can help you achieve the best outcome.
Opening Image credit: https://www.intelogy.co.uk/ & https://www.insentragroup.com/


")
